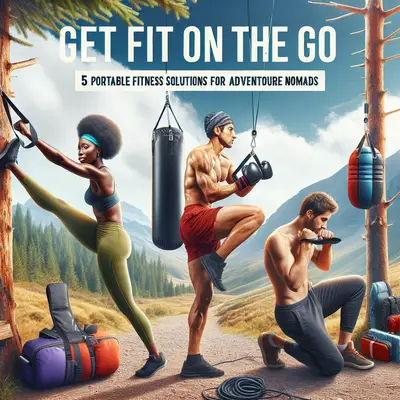
Your backpack is your closet, your office, and your gym—whether you’re chasing Wi‑Fi in Lisbon or sunrise buses through Patagonia. But staying strong on the road doesn’t mean hauling a suitcase full of iron. With the right portable equipment and a few smart tactics, you can turn layovers, hostel courtyards, and Airbnb balconies into adventure-ready training grounds.
This guide dives into travel-friendly gear that actually earns its pack space and gives you five field-tested fitness tips to stay powerful, mobile, and injury‑resistant wherever your passport takes you.
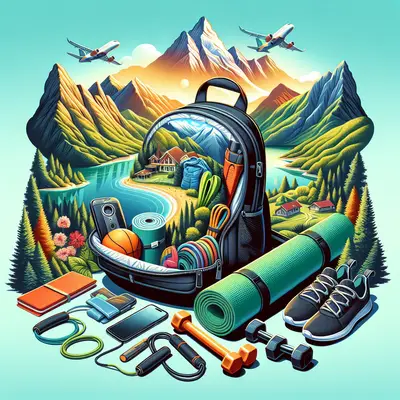
Building a “One-Bag Gym” That Fits Your Life, Not Just Your Luggage
Before you buy anything, decide what kind of traveler you are—and how you actually move.
If you’re a fast-moving backpacker hopping cities every few days, ounces matter more than options. You’ll want ultra‑light, multi‑use gear: think a single long resistance band, a compact jump rope, and maybe a set of mini‑bands. Digital nomads who stay in one place for weeks can afford one or two heavier tools, like a foldable yoga mat or a lightweight suspension trainer.
The goal is to build a “one-bag gym”: 2–5 pieces that can cover push, pull, hinge, squat, and core work with minimal setup. Prioritize gear that:
- Packs flat or coils tight
- Can anchor to doors, trees, posts, or furniture
- Survives sand, sweat, and questionable hotel carpets
- Replaces bulky equipment like dumbbells or machines
Think in systems, not single exercises. For example, a long resistance band can become a “cable machine” for rows, presses, pull-aparts, and hip work, while a suspension trainer covers dozens of bodyweight variations without touching a traditional gym.
Essential Portable Gear That Punches Above Its Weight
Here’s a practical lineup of gear that earns a spot in an adventure-ready pack, whether you’re heading for city skylines or mountain switchbacks.
1. Long Resistance Bands (Loop or Tube)
These are your all-terrain workhorses. Long bands can:
- Replace rows, presses, curls, triceps work, and banded squats
- Add resistance to push-ups, hip thrusts, and glute bridges
- Assist pull-ups on hostel door frames or park bars
Choose 1–3 tensions: light for shoulder/rehab work, medium for upper body, and heavier for legs and glutes.
2. Mini-Bands (Hip Circles)
They weigh almost nothing but dramatically upgrade your lower-body training. Use them for:
- Glute activation before hikes or runs
- Banded walks, clamshells, and hip hinges
- Turning bodyweight squats into legit strength sets
They also double as warm-up tools before heavy stair climbs, long walking days, or snowboard sessions.
3. Suspension Trainer or Gymnastic Rings
If you’ll regularly have a door, balcony, or tree to anchor to, a suspension trainer or packable rings gives you:
- Adjustable rows, presses, face pulls, and fallouts
- Single-leg squats and assisted pistol squats
- Core burners like body saws and roll‑out variations
They take up a bit more space, but for long stays, they’re one of the highest-return pieces you can bring.
4. Travel Jump Rope
Perfect for short, intense conditioning sessions:
- 5–10 minutes can replace a long run when time or safety is an issue
- Great for tiny spaces: rooftops, courtyards, even wide hallways
- Easy way to spike heart rate after strength work
Choose a rope with adjustable length and metal handles if you want durability, or ultra‑light plastic handles to save weight.
5. Packable Mat or Towel Hack
A foldable travel mat is ideal if you do a lot of floor work, mobility, or yoga. But if space is tight, a large microfiber towel works as:
- A barrier between you and questionable hostel floors
- A padding layer for knees, elbows, or spine
- A makeshift yoga mat on tile, hardwood, or concrete
Whichever you choose, it’s a small investment that makes you much more likely to actually train.
Five Trail-Tested Fitness Tips for Travelers and Nomads
These tips are built for people who live out of a bag, fight time zones, and never know what tomorrow’s “gym” will look like.
1. Train by Time, Not by Perfect Programs
Travel wrecks routines—flights run late, buses get canceled, and sunsets beg for detours. Instead of relying on a strict split (like “chest day” or “leg day”), think in time blocks and movement patterns.
For example:
- 10–15 minutes: one movement per pattern (push, pull, squat/hinge, core), 2–3 sets each
- 20–30 minutes: circuit 4–6 exercises, 30–45 seconds of work, 15–30 seconds rest
- “Micro-sessions”: three 5-minute blocks scattered through your day (morning, mid‑day, evening)
This approach keeps you consistent even when you only have a layover or a random 15‑minute gap between Zoom calls and dinner plans.
2. Use Your Gear to “Upgrade” Daily Movement
When you walk all day, climb city stairs, or hike steep trails, your body is already doing work. Your portable equipment’s job is to sharpen that into intentional training, not to replace it.
Try:
- Mini-band walks before big sightseeing days to wake up glutes and protect knees
- A few sets of banded rows after long laptop sessions to balance out all that forward hunching
- A quick suspension trainer or band workout before or after hikes to reinforce strength in the same patterns you just used outdoors
Think of it as tuning your engine, not just pounding the gas pedal.
3. Anchor Your Routine to Fixed Daily Events
Time zones change. Check‑out and check‑in times change. But certain anchors stay relatively stable:
- Your first coffee
- Your last screen time of the night
- Morning light or evening wind‑down
- “One coffee, one circuit” rule: you can’t open your laptop until you finish 10–15 minutes with your bands or suspension trainer
- Nightly “reset”: 8–12 minutes of light band work, core, and mobility before sleep to undo the day’s travel stiffness
- Post‑work ritual: shut the laptop, hit a 10‑minute EMOM (Every Minute on the Minute) with bodyweight and band moves
Attach your fitness to one of those anchors:
Anchoring beats motivation, especially on jet lag and long-haul travel days.
4. Train “Travel Muscles” First: Back, Hips, and Core
Suitcases, backpacks, airplane seats, and makeshift desks all attack the same zones: your upper back, hips, and core. Prioritize these even if your session is short.
Examples using portable gear:
- Back: band rows, face pulls, pull-aparts, suspension rows
- Hips: banded glute bridges, mini-band lateral walks, Romanian deadlifts with bands
- Core: plank variations, banded dead bugs, standing anti-rotation presses (Pallof presses)
If all you do is 10–15 minutes of back/hip/core work a few times a week, you drastically reduce your odds of travel-related aches and injuries and stay ready for spontaneous hikes, surf sessions, or bike tours.
5. Keep One “No-Excuse” Routine in Your Back Pocket
Some days you’ll be exhausted, delayed, or just mentally done. Have a default routine that:
- Uses only one piece of gear (or bodyweight)
- Fits in 6–10 minutes
- Needs almost no space
- 1 minute: mini-band lateral walks
- 1 minute: banded glute bridges
- 1 minute: push-ups (knees or full)
- 1 minute: banded rows (around feet or a fixed object)
- 1 minute: plank
For example, a Mini-Band No-Excuse Session:
Repeat 1–2 times if you have more gas in the tank.
Or a Long Band Traveler Session:
- 10 band squats
- 10 band rows
- 10 band presses (standing chest press or overhead)
- 10 hip hinges / RDLs
- 10 core moves (banded Pallof press or dead bug)
Cycle as many rounds as you can in 8–10 minutes.
When you make the minimum small and simple, you’re far more likely to show up—even after a red-eye and a border crossing.
Putting It All Together on the Road
Portable equipment doesn’t replace the wildness of your travels—it amplifies it. With a curated one-bag gym, you can chase volcano summits, scooter through new cities, or sprint for trains without worrying that each travel day is quietly erasing your strength.
Choose gear that earns its place in your pack, then layer in time-based sessions, smart anchors, and a no-excuse routine. Treat your workouts like your passport: something you always keep on you, ready to deploy when an unexpected window opens.
Strong legs hike more trails. Resilient backs carry more packs. Durable lungs chase more sunrises. Your gear is just the bridge between the life you’re living now and the adventures you don’t want to age out of.
Sources
- [Centers for Disease Control and Prevention – Physical Activity Basics](https://www.cdc.gov/physicalactivity/basics/index.htm) - Guidelines on recommended weekly activity levels and health benefits of regular exercise
- [American Council on Exercise – Resistance Band Workout Guide](https://www.acefitness.org/resources/everyone/blog/7639/how-to-use-resistance-bands-the-basics/) - Practical information on using resistance bands effectively and safely
- [Harvard T.H. Chan School of Public Health – Benefits of Physical Activity](https://www.hsph.harvard.edu/nutritionsource/staying-active/) - Overview of how consistent movement supports long-term health and performance
- [Mayo Clinic – The Importance of Core Exercises](https://www.mayoclinic.org/healthy-lifestyle/fitness/in-depth/core-exercises/art-20044751) - Explains why core stability is critical for posture, balance, and injury prevention
- [Cleveland Clinic – Tips for Exercising While Traveling](https://health.clevelandclinic.org/stay-fit-while-traveling/) - Practical strategies for staying active away from home
Key Takeaway
The most important thing to remember from this article is that this information can change how you think about Portable Equipment.